Showing posts with label Luthier. Show all posts

Sunday, 1 May 2016

What's new on the workbench today?

Fender Telecaster Setup

We have a very special guest in the workshop this weekend, a lovely blonde Fender Baja Telecaster! A friend asked me to take a look as he was getting some issues bending strings on the higher frets so I said I would do a setup for him.


Of course I have to thoroughly test her to see exactly what the problems are! Hope my blue Tele doesn't get jealous!


He asked me to replace the strings so that is first order of the day, there are a lot of retro features on the Baja including classic slotted machine heads so I carefully followed the instructions in my Haynes Telecaster manual to ensure I pre-cut the strings to the correct length.  However before I cut the strings I gave the frets and lacquered finger board a good clean.  There isn't much wear generally, in fact the guitar is quite lovely however a couple of the jumbo frets have little nicks in them and will need redressing at some point.


At this point though that is not a necessity and my friend does not want that done anyway.  I ran a fret rocker over all the frets but the frets all sit happily level with each other with the only exception been the tiniest bit of movement around the 11th fret on the low E side of the neck which should not be problematic as there is no discernible fret buzz.  


After fitting a new set of strings I took a look at the bow in the neck, it is slightly more bowed than fender recommend but I will let the neck settle overnight with the new strings and take another look tomorrow and adjust the truss rod if I feel it is required.  I removed the pickguard to inspect the truss rod adjusting screw which is at the neck pickup end of the neck in true classic style.  I will need to loosen the strings and slacken the neck retaining screws to give me access if I need to adjust the truss rod, this will allow me to tilt the neck back a little for better access.

Router Table

I managed to get some time on my new router table recently and made a couple of Telecaster neck blanks as well as a copy of my template.


Making the template copy out of MDF was far easier than attempting to route the hard wood I had chosen for my neck blanks.  I had to purchase a decent 1/2" bit with a top bearing and a collar to fit the router as it comes with a 1/4" one but I could not find a bit I was happy to use.  On one attempt the bit came lose and ruined the blank I was working on, a lesson learned there!


The router and the table performed great and I look forward to creating a copy of body template and then a couple of Telecaster bodies.  The reason I want to create a template from the template is so if I damage my copy I can easily create another from the original.


I now have 2 blanks ready to turn into necks, I am low on funds though at the moment so the project is on hold for a little while!  I will update here one I get some bits together, maybe after my next pay day!


Sunday, 3 April 2016

Router Table for Making Electric Guitars

I decided a long time ago that I would like to buy a router table and so I finally took the plunge (excuse the pun!) and splashed out on a Triton table and router.  I had attempted to mount a small router to my table saw as there is a hole in the table top for a router but this proved to be more trouble than it was worth plus I wanted a dedicated router workstation.  I began to look around for inspiration and found it on Amazon where I combined the purchase of a Triton RTA300 Precision Router Table, a Triton MOF001 Dual Mode Precision Plunge Router, 1400 W and a Triton RSA300 Router Stand. I think it was the picture below which sole it for me!


Triton offer 3 compatible routers and I chose the middle option which fitted into my budget and the 3 items cost £425 which comes in at just over £20 a month over 2 years on their 'pay monthly' option.

The legs and table come flat packed so you have to assemble them yourself and the instructions are a little vague but not impossible.  Some of the diagrams are not particularly clear but after a couple of hours I have attached the tabletop to the legs and assembled the fence and sliding board in the top.


There is a good dust extraction attachment and Amazon sell a companion Triton DCA300 Dust Collection Bucket, 20 L which will link to a conventional vacuum or an existing dust extracting system but I plug my vacuum in directly at the moment.

Once I had the top assembled it was time to mount the router to the removable plate.  The plate consists of 2 pieces of powder coated metal which screw together with the addition of some spacers.  The process of attaching the router to the plate is a very simple process and took seconds.  The router itself can be adjusted from above the table however you have to screw the access hole yourself.  This proved to be quite a challenge as accurately drilling through the plate in perfect line with the router was quite tricky. You can connect almost any router to the table and a comprehensive set of adapters is provided so  the manufacturer decided not to drill holes for every combination in the mounting plate, but you would have thought they would have at least marked the top with the location for the holes for their own equipment. 


After some drilling and fine tuning with a round file I was able to slot the winder handle into the top of the router table mounting plate and fine adjust the height easily.  Before the router could be used in the upside down position though the instructions tell you to remove a large spring which was a simple task. There is a sliding fence is fully adjustable complete with planing shims, adjustable slides to hold the work and a clear guard.  There is a sliding table insert with an adjustable protractor and a separate safety mains switch mounted on the right side of the stand.

The router itself is solid and highly adjustable including variable speed control and a handle winder and 3 stop plunge block.  The only disappointment is the omission of a 1/2" colett.  The router comes with 1/2" and 8mm collets but the 2400W model does come the the larger collet.  The 1/2" collet is available though for about £20.

I needed to order some bits so a full review on performance will follow later but for now i'm excited about this purchase and cant wait to get stuck in and see what I can achieve.

Thursday, 18 September 2014

DLP Les Paul - 11 - Trying to Finish the Finish

I have been leaving the DLP Les Paul hanging in the garage for well over a month since I last applied lacquer so at the end of last week I started wet sanding the body.  I don't trust myself with courser grades of wet and dry sand paper as it's so easy to sand straight through the lacquer so I have come in at 2000 grade wet and dry from the start.


So it means a lot more work but I would rather be safe than sorry at this stage.  Straight away I noticed a lot of sunken areas in the grain, small valleys sitting below the general level of the rest of the paint.  The are not cracks in the paint of lacquer but it just seems that the previously smooth surface has sunk!


 Also an are on the side had actually bubbled, so I had no choice other than to sand through the lacquer and paint back to bare wood and respray the side.  It's quite obvious that the wood had not dried out completely leaving moisture trapped under the layers of paint and lacquer.


I masked the body and sprayed the side with black paint and let it set for a couple days before feathering the edges.  I will need to spray several coats of lacquer over the resprayed area but before I do that I want to flatten as much of the existing finish and respray lacquer over the whole body.


Hopefully if I put enough lacquer over the whole body it will fill in all the voids and give me a nice surface to flatten and polish.  Not ideal but practical!


Monday, 8 September 2014

Telecaster III - 22 - Finishing Touches

With the pickguard finished connected all the electrical parts together which was a simple enough job.  I added an additional grounding wire to the base of the bridge, I had to drill a hole through to the bridge pickup cavity and pass the wire through the same hole the pickup wires passed through.


I took the neck off one more time and cleaned and lubricated the truss rod adjustment nut.  I also sanded the neck cavity just to remove some of the unevenness caused by over-spray. The machine heads are already on the neck so it's time to string the guitar up for the first time.


Straight away I noticed that the neck needs tilting slightly so I shimmed the front of the neck pocket raising the nut end slightly.  I wish I had something like an old pound note to use just to add to the antique feel! (None UK Friends - We don't have Pound notes any more in the UK!)  I also had to add 2 string trees to the head. Not the round style the oldest fender heads have, I'm not trying to make an accurate copy, just an approximation of something 50+ years old!


Once the neck was shimmed I filed the nut and set the height of the strings as per fender's specifications.  I also set the bridge string height adjusters and adjusted the intonation and pickup height.  Time then to tune up and plug in... There is a crisp clear twang from the bridge and a more rounded punchy sound from the P90. Perfect!


The guitar looks great and sounds even better.  Even though I never planned a finish like this it's turned out to be the finest instrument I have made to date.

Wednesday, 3 September 2014

Telecaster III - 21 - Custom Pickguard

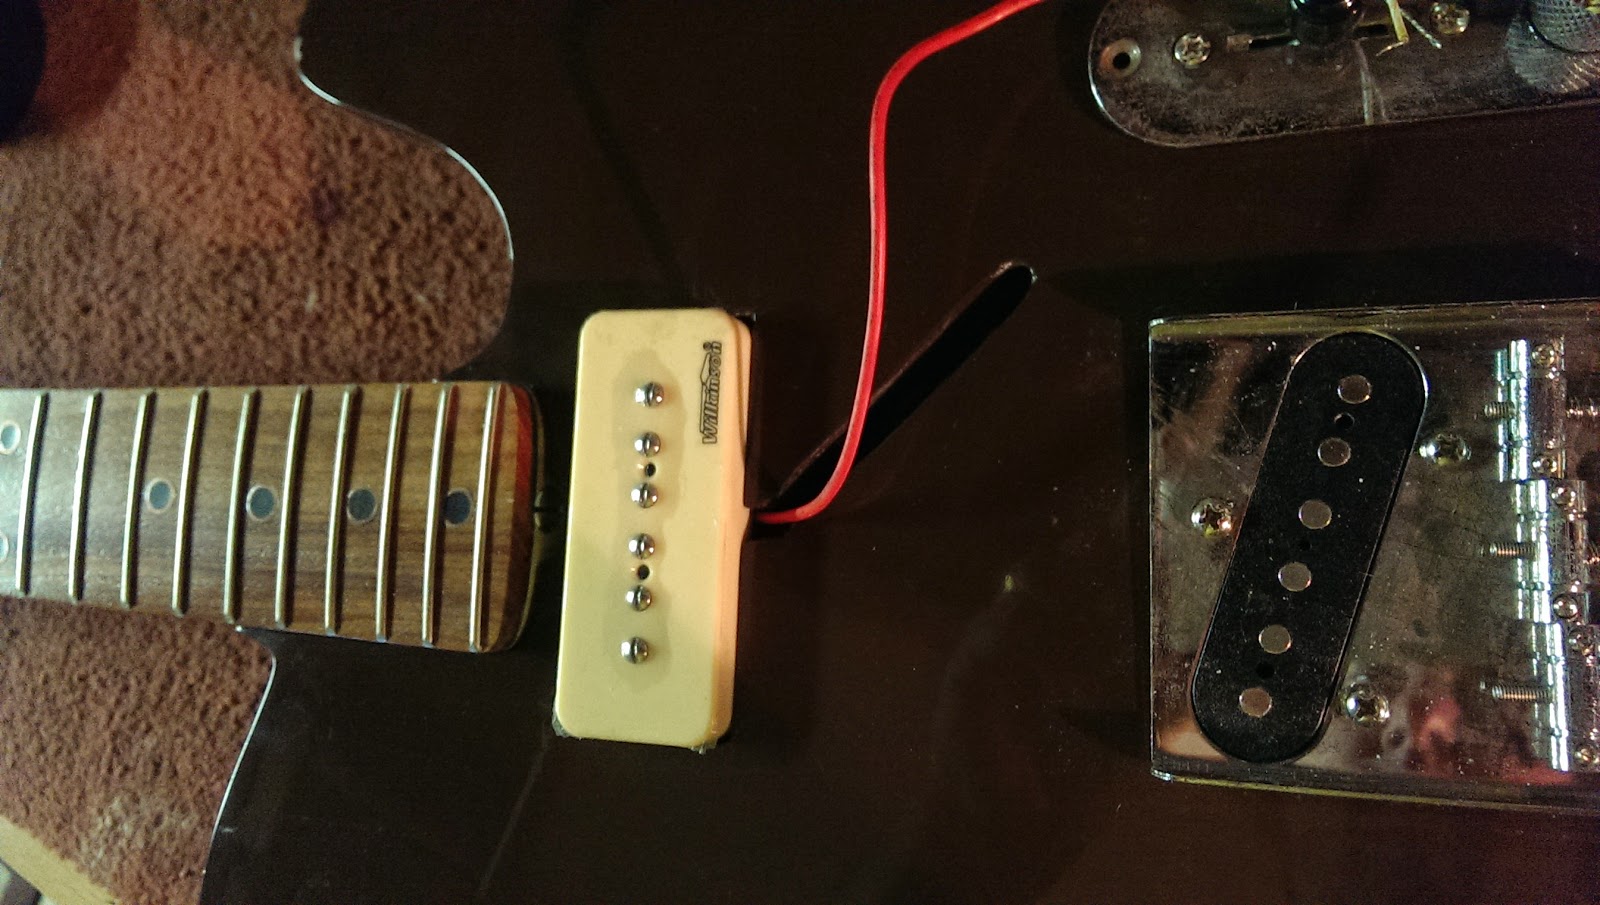
My original concept for this guitar was to feature a rather unusual and original pick guard and a P90 pickup in the neck position.  I built another Telecaster last year with 2 P90s and the sound that impressed me most was what came out of the neck pickup.  With that in mind I made a template but I just don't think the design sits well with the relic body.


So I had a look at a stock Telecaster pickguard, I had a couple to play with and the pearlescent white one looked great, but in my opinion it doesn't scream old.


I also like the idea of a 5 hole pickguard, like fender originally installed on their earliest Telecasters.  So with this in mind I set about creating a bespoke pickguard made from an unused / un-etched copper backed PCB board.  I cut out a basic card template and then used my jigsaw to cut out the basic shape before grinding the edges to the template outline on my drum sander attachment.


Once the basic shape was achieved I marked the neck position carefully on the blank and slowly filed away the material testing the fit frequently.  I don't want large gaps anywhere, so patience and care was required as I slowly worked towards a nice snug fit.


Once the neck slot was finished I was able to position the control panel and mark it ready to cut it's slot and once again I want the fit to be perfect.  Again patience and care was needed to ensure a perfect fit.


Next I cut the P90 pickup hole, I pondered how I was going to achieve a perfect fit knowing the routing for the pickup slot is already tight and there is not much room for adjustment.  So the position of the hole in the pickguard has to be perfect.  My solution was to put 4 pieces of masking tape across the guitar, the edges of the tape ran level with 4 sides the cavity so that when I put the pick guard on top of the guitar again I was able to mark the position of the tape and where the lines intersected marked the exact position of the cavity below.


I carefully used my jigsaw to cut the cavity out leaving plenty of the line to allow me to file the rest of the material away testing the fit as I went along. After quite some time I was happy with the fit and I dropped the pickup into its cavity and fitted the pickguard and everything lined up perfectly.


Finally I filed away an section to accommodate the bridge and drilled and countersunk five holes for the screws.  I went over everything with fine wire wool, this brought back some of the shine and removed the tool marks and layout lines, it will age nicely to a dark colour over the coming weeks. I found some pretty old screws which had nicely rusted and aged in my garage and attached the pickguard.


I like it and I think it goes well with the rest of the body, defiantly not another like it in the world I think!

Tuesday, 2 September 2014

Telecaster III - 20 - Decided to Relic

It has been some time since I posted anything about this guitar, in my last update I had filled and sanded the body ready for paint but the weather was too cold so I put off painting until things warmed up.  During the course of the summer I primed the body but noticed one of two areas where the paint bubbled so I would sand back and prime again.

I decided to paint the body brown in the end, the neck is oak and I liked the idea of earthy colours for this particular guitar. After several coats of brown paint and lacquer I left the body to hang in the garage while I went on vacation and everything seemed fine.


However when I looked at the paint after my holiday the same bubbling had occurred.  I suspect it was down to the wood I used.  I believe it must have not been fully dry and moisture is trying to escape causing the bubbles.  So my choice was to sand the body down to bare wood again or have a go at creating a 'relic'


I decided to go for the relic option and set about sanding away at the finish I had so painstakingly produced with sand paper and wire wool.  Luckily the worse of the damage to the paintwork was right on the front and back where the guitar would normally sit under the players arm and the perfect place to simulate years of playing.

I took a lot of paint off using a course sand paper and then started gradually feathering the edges to produce a nice gentle transition between the paint and the bare wood before wet sanding the body as I would normally.

I imagine the player of this guitar wore a heavy trademark leather jacket which just wore away the paint over years of repetitive use! He may have even refinished the guitar himself a couple of times... Who knows, it's all make believe!

The exposed wood looks too new underneath so I stained it with a couple of coats of darkish wood stain.  I then rubbed most of this out with wire wool. There were a couple of other


While I was working on the body I also started the ageing process on the metal components.  I had read that PCB etching fluid was ideal for this and I just happened to have a tub full at home!  The technique requires some roughing up of the chrome parts first (a couple of light scratches here and there and rub down with wire wool especially in areas where wear would normally occur over time).


The components are then covered with a single ply of tissue and the etching solution is brushed on and left until the desired amount of ageing is achieved.  It worked perfectly until I realised I had aged the wrong bridge!  I aged the correct bridge in the same way and the results were great.  I want to repair a little bit of the damage so everything was buffed with metal polish.


The results were great.  I didn't damage any of the screw threads in the same way but some of the screw heads received the same treatment.


While this was going on I was also bumping and dinging the body with anything I could fine, particularly around the base where it may have stood on hard stage floors or bumping into amps.  Also around the jack socket and behind the bridge adjustment screws.


I tried the neck on for size and it fits great.  I don't plan on doing any damage to the neck, once again i imaging the old one wore out and this is a recent replacement!


Next I have to decide what pick guard to put on this guitar, I have some ideas including something completely original but that will have to wait until my next post.

Saturday, 30 August 2014

DLP Lap Steel Guitar - 8 - Final Finishing

Over the past month or so I have been adding the finishing touches to the DLP Lap Steel Guitar.  The body was progressively sanded with finer grades of sand paper and finally scraped smooth with a cabinet scraper and then fine wire wool.


The body is made of cherry and darkens naturally in UV light so leaving the guitar hanging in the garage for the past couple of months has matured the wood beautifully.  I had decided to use gun stock oil to finish the body to give a smooth hard wearing semi gloss finish and started adding thin layers using a lint free cloth.


The fingerboard is made of mahogany and needed several thick coats to fill the grain, I used my finger to apply the finish liberally.

 
The body starts to take on a natural sheen after a couple of coats.  I apply a coat then leave it to dry for an hour or so and then apply another adding about 3 coats a day.  After about a week I wet sanded the body to both flatten the finish and remove any dust which had found its way onto the body.  I was then able to apply the DLP logo once the face of the head was sanded flat, I used a water-slide transfer and started over coating with more finish once it had completely dried.


After hanging the guitar to dry for a couple of weeks I buffed the finish with a fine abrasive compound and then applied a coat of furniture polish and started re-assembling the finished instrument.


Re-assembly was quick as the hard work was done before the finish was applied.


I'm very pleased with the finish, the fret board has a lovely deep shine and the cream binding I used as fret markers has an antique feel to it now.  The green abalone fret dots look deep and shiny as well.


The routing for the P90 pickup looks perfect so no need for a pick guard, it would be for aesthetic purposes only as a pick guard probably wouldn't be needed on a lap steel guitar.


I used Tru-Oil to finish the guitar and I have to give it a thumbs up, it is easy to apply, the odour is not unpleasant or too harmful and the finish can be almost anything you want from a dull matt finish to a high gloss mirror like shine.


A Tru-Oil finish is easy to repair and takes polish well also.  I chose not to buff the body and neck too much but did shine the fret board to a slightly higher sheen.


There is a lovely natural contrast in the grain of the wood and I think that adds to the unique personality of the instrument.  There certainly wont be another like it anywhere in the world!


I strung the guitar up and tuned it to a basic open E and tested all the electronics before carefully packing it away ready for sale.  As much as I would love to keep this instrument I cant do it justice so it needs to go to a good home.


Have a look here on ebay for any of my UK readers who are interested.