Sunday 30 June 2013

Telecaster Two - 32 - Mounting The Bridge

I wanted to mount the bridge today so I roughly laid out the position on the centreline with the saddle line.  In the perfect world that would be exactly 25 1/2 inches (647.7) from the string side of the nut, however in the real world I measured the difference between the nut and the centre of the 12th fret then transferred the same distance down to the centre line on the body (654mm in total).


I then had to extend the neck outline down to the area of the bridge and this is when it became obvious that the neck was not as central as I had first though.  So after some considerable adjusting and repositioning of the neck I measured everything again this time transferring everything via pencil lines on masking tape.


This time everything lined up nicely and the bridge lined up centrally with the body and the neck. I had read that the saddle line should be about 4.75mm (3/16th of an inch) further than the actual scale length to help with intonation so I laid out a second line and positioned the bridge according to that marking out the holes for the mounting screws and the 6 through sting holes.


After drilling the 3 mounting holes I screwed the bridge in place and then used it a a template and guide for the through string holes.


I still haven't decided if I should use a pickguard or not.  The accuracy of the pickup cavity routing has to be perfect and I think the standard controls would look wrong as well, the switch and knobs would need to be mounted directly in the top so I would have to route an access panel on the back as well.


The guitar would look awesome without the pickguard but I think I will continue with one in mind rather than without.


When I removed the masking tape some of the layers of Tru-Oil and stain came off as well, the masking tape was more sticky than I realised.  However as Bob Ross used to say "We don't make mistakes, just happy little accidents..."


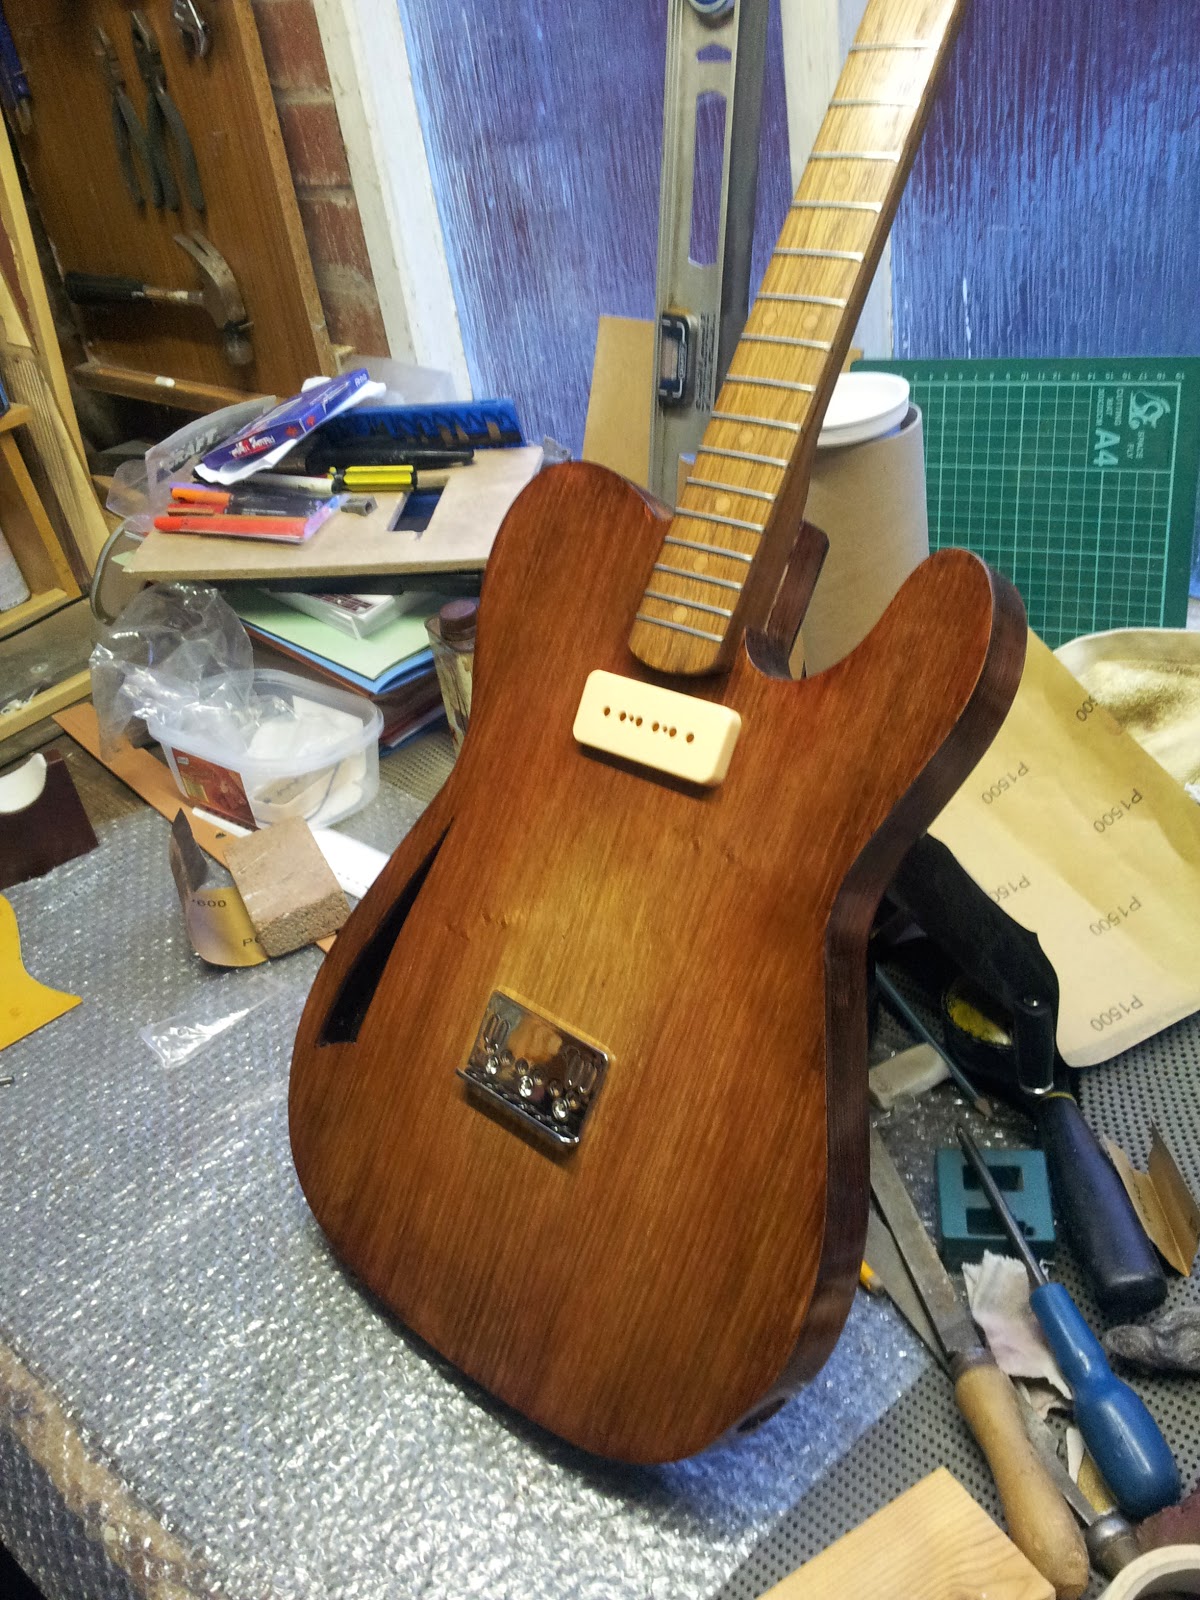
The tape took the finish right back to the light oak so I sanded an area around the blemish to really bring out the sunburst effect I had been after from the start.


I cant wait the route the bridge P90 pickup cavity and we can really start getting a feel for this Telecaster and how it's going to end up looking.


Saturday 29 June 2013

Telecaster Two - 31 - Neck Pickup Pocket Route

Last night I started making a template for the P90 pickup cavities.  I carefully measured one of the pickups and transferred the markings to blank piece of MDF.  I then drilled a hole in the 4 corners and cut out the hole with my jigsaw and a clamped straight edge.


The template worked fine and I routed the slot with a router bit with a bearing on it which ran around the inner perimeter of the template.


It was nice to see the hole I had drilled for the wires was there waiting for me.  with a little fine tuning I have a nice snug fit for the neck pickup.


With a little more stain applied around the edge of the pickup cavity it was ready for another thin coat of Tru-Oil.


The front is looking nice, I keep spreading thin coats of Tru-Oil all over the body, its really starting to shine now!


Thursday 27 June 2013

Telecaster Two - 30 - More Tru-Oil

Not much of an update today other than I lightly rubbed the Telecaster body down with 0000 wire wool and then added another coat of Tru-Oil to the front, back and sides.


I then repeated the process after a about 90 minutes and will continue doing this for the next couple of days gradually building up the thickness of the Tru-Oil ready for polishing and hopefully a deep glass like shine.


I wanted to start work on the routing templates for the P90 pickups.  I need to practice with the router once I have made the pickup template as I don't want the same issues I had with the neck pocket.  I did a little fine tuning to the pick guard as well this evening, it is waiting for the pickup to be mounted so I can cut a hole in it around the neck pickup.

Wednesday 26 June 2013

Telecaster Two - 29 - Sanding Back The Dark Oak Dye

As previously discussed, I want to have a dark stain in the background with the Indian Rosewood stain adding a reddish hue.  Tonight I sanded back a lot of the dark oak stain on the back and sides with 120 grit paper and then smoothed down to 600 grit wet and dry.


Meanwhile on the front of the guitar my experiment with producing a subtle sunburst was a limited success however not what I was hoping for.  The body now looks fire damaged!


I took a soft cloth and wiped the front of the Telecaster body with white spirit, then sanded everything smooth. another wipe with white spirit and most of the stain had gone.


There is still a hint of the dark oak on the front which I like and which goes some way towards my idea of a subtle burst.


After a couple of hours drying the back looks beautiful and the contrast with in the grain looks great.


Finally this evening I have put a coat of Tru-Oil over the body more for protection at this stage.  I still have the routing to do for the pickups and the control panel and finally through the body for the strings.


I also have to drill the holes for the tuners in the head.  Then proper finishing and put it all together.

Tuesday 25 June 2013

Telecaster Two - 28 - Some Colour On The Body

First job of the evening was to sand back the stain on the back of the Telecaster body as there were several scratched across the grain which just jumper out at me.  I used a flat block and 120 grit followed by 600 grit and 0000 wire wool then applied a thin coat of sanding sealer and let it dry before lightly sanding with 600 grit sand paper.


I then sanded the front and sides lightly and covered everything with a wet coat of dark oak wood stain.  My idea with this is to give the Indian Rosewood a dark flat background to contrast with it's reddish brown richness.
It looks a mess and shows where I over applied the sanding sealer but I intend to leave this to dry tonight and sand a lot of it back tomorrow and then apply a couple more coats of the Rosewood dye.


I am also experimenting on ways to create a subtle burst on the front of the body by just concentrating the stain around the edge of the body.  Once again it looks a mess now but some sanding once it is dry will smooth everything out.


Monday 24 June 2013

Telecaster Two - 27 - Fixing The Neck

At last I have finished fine tuning the neck pocket and fixed the neck to the body.  Look closely and you can see Luke in the neck plate!  The neck lined up perfectly with the centre line.


I confirmed this by taking a thin strip of wood about 3" long, drilling several holes up and down the length of the wood and then lining up one of the holes at the top with the 3rd fret marker and one of the holes at the bottom with the centre line.  Everything in between should line up... and it does.


Next I decided to apply a coat of stain all over.  This is where I find out if the layers of sanding sealer have done their job.  Logic would seem to dictate that I apply stain to the wood and then seal it with the sanding sealer, however the idea of applying the sanding sealer first is to ensure the wood soaks into the grain evenly.  Pine will drink wood stain and appear darker on the end grain which just looks ugly.  It may take a few coats to build up colour but it should be worth it.


The oak on the front should only take a couple of coats of stain just to give it and even rich colour.  The pine body will need several coats and I will probably have to sand back some areas, apply some more sanding sealer and apply more stain until I get a nice even deep rich colour which brings out the grain.


I am using an Indian Rosewood wood dye and apply it with a soft cloth and then quickly wipe off with a dry cloth.  I had previously wiped the surface down with white spirits just to ensure all the greasy fingermarks had been removed.


Hopefully the colour of the body will complement that of the neck.  I will let everything dry overnight and have a look tomorrow after work.

Telecaster Two - 26 - Still More Neck Pocket Work

I'm still not happy with the neck pocket, when I offered the neck to the pocket the centre line was off.  It would seem my previous efforts at packing the neck pocket had snugged up the joint but left the neck off centre.


So first thing this morning I put in another piece of packing and glued it to the side of the neck pocket.


After letting it dry all day I took the clamps off tonight and used a chisel to remove some of the excess material. I then sanded the surface level and and started removing material inside the neck pocket been careful not to take too much off by offering the neck up the the pocket and checking the position and what I had already removed.


Gradually I approached a point where the neck is lined up with the body's centre line and maintained a snug fit without been too tight to split or distort the neck pocket.


Once I had the pocket how I wanted it I added a coat of sanding sealer especially around the areas I have been working.  Next I gave the neck another coat of Tru-Oil just to build the protection up a little more focusing on the areas around the heel although there was no real marks or scuffs from where I had been trying the neck in the pocket.


I do love the way the Tru-Oil brings out the grain, but this is the first time I have noticed how robust the finish is as well.


Friday 21 June 2013

Telecaster Two - 25 - Neck Pocket Recovery Work

So its out with the chisel and sandpaper to try and recover the neck pocket.  I am trying to take even amounts off the fillets and I keep offering up the neck to make sure I don't take too much off one side or the other.


With the neck pocket looking OK I can concentrate on the pick guard.  I will be making it from a blank piece of un-etched printed circuit board.  For what it's worth the back it copper plated so on the right project this would make a great material to shield the electronics.


There is a lot of fine tuning to do and I have yet to decide how to finish the pick guard once it is finished.


I have also got to decide what colour to finish the pick guard, also if I should file the edges at an angle or round them over or leave them at a 90 degree angle.


I need to make sure my routing is a little more accurate when it comes to making the cavities for the pickups.

Thursday 20 June 2013

Telecaster Two - 24 - Neck Pocket Disaster

After completing the neck pocket template a couple of days ago I added a layer of sander sealer or two just to add a little strength to the working surface.  Then last night after work I set up my workbench outside and patiently positioned the template according to the centre line on both the body and the template.  With the template and body securely clamped the the workbench I set up my router with a cutting bit which uses a bearing to run round the inside of the template. 


I measured the depth  I wanted to route by positioning the neck and a scratch guard next to the body and marked a line.  This would have the overhang just clearing the scratch guard.  So I have measured everything with the greatest precision I can manage, checked and double checked the template to ensure a snug fit and i thought I had accounted for everything... How wrong was I... The template was no where near as robust as I thought and the bearing started to dig into the template giving me an oversized neck pocket!  


I haven't got any post route pictures as yes, the above picture is from just before I routed the pocket.  I had just added another coat of Tru-Oil to the Telecaster style neck.
Tonight I have had a think about how I am going to fix this.  I could scrap the neck for this project and build another, or scrap the body and build another, making a new neck or body to match the scrapped parts.  In the end though I decided to glue in a couple of small fillets of pine into the gaps and then re-route the pocket after constructing another template out of more robust material.  For now the glue is drying and I will leave it to set overnight.

Tuesday 18 June 2013

Telecaster Two - 23 - Neck Route Template

This evening I didn't have much chance to get up to much bit I did manage to create a template for the neck cavity routing.  Hopefully this will give me a nice tight fit as the template is snug.  


I also sanded the body and applied another coat of sanding sealer to the back and sides.  I managed to repeat the process a little later as well and the body is feeling lovely and smooth now.  Also I took the shine off the neck and applied another coat of Tru-oil, I managed to repeat this before I packed up for the night.


I did have a quick think about what style pick guard I will put on this body.  I am not keen on the Fender Thinline pick guards and I like the idea of a hybrid between a standard Telecaster and a Thinline so I think I will keep the metal plate mounted controls, make a custom scratch guard and modify it to accommodate the short bridge and P90 pickups.

Monday 17 June 2013

Telecaster Two - 22 - Shiny Neck

The neck has been drying for the last 24 hours after I coated it with a coat of Tru-Oil.  The back of the neck is was too shiny and will just cramp the playing style as it slows the neck action down so I took the shine off with some 0000 wire wool.


There is still a lot of work to do with this neck but the grain looks beautiful particularly on the head.


And the back doesn't look too bad either.  I will mull over what to do next to the neck, I need to drill the 6 holes for the machine heads and add a decal, then overcoat the decal with lacquer whilst keeping the back of the neck smooth and fast.


I need to route the body for the neck soon as well and finally start getting a feel for how this is going to look finished.

Telecaster Two - 21 - Smoothing the Body and Routing a Round-Over

Tonight I decided to round over the back edge of the Telecaster body.  I selected a round-over bit and was careful not to expose too much of the cutting surface.  The bearing rides around the edge of the body ensuring a consistent smooth round-over.


I did this freehand and took my time been careful not to let the bit snatch against the grain or run away from be with the grain.


After I had finished rounding over the back edge I returned to the tedious task of sanding everything smooth going through from 80 grit sand paper to 800 wet and dry sand paper.


Once I was happy with the surface I applied a coat of sanding sealer to fill up any voids left in the grain and protect the wood and prepare for final sanding.  It is not grain filler so I had to ensure there were no huge scratches and marks.

The first coat dried almost immediately so I applied a second, once again by rubbing it in with the grain using a small piece of soft cloth.  I will leave this to dry and continue to soak in overnight and sand it smooth tomorrow.

Telecaster Two - 20 - Smoothing the Body and Neck

The neck has now had a couple of coats of sanding sealer and after sanding the back of the neck smooth (down to 1500 grit wet and dry sandpaper) I removed the masking tape protecting the fingerboard.  There is a nice contrast at the moment but the fingerboard has no protection at all so I want to add a very thin coat of Tru-oil just to act as barrier against moisture, dirt and grime.  I don't want a shiny fingerboard but it needs something for protection.


I sanded the fingerboard lightly and gave it a final clean with lighter fluid making sure I cleaned right into the edges of the frets. After applying a light coat to the fretboard I turned my attention to the rest of the neck adding a coat of Tru-oil all over the headstock etc.


After this coat has dried I added another coat and set the neck aside to dry.  It is very shiny at the moment but I may have to sand this back as a glossy finish on the back of the neck will make it more difficult to slide up and down the neck smoothly.  I the turned my attention to the body.  The sanding sealer and grain filler have done a fabulous job of smoothing out the grain on the front of the body so time to turn my attention to the back and sides.


There is a lovely natural grain and knot patten on the back and sides of the Telecaster body so I want to preserve this and show it off as much as possible.


There as some quite deep marks round the sides from earlier machining so I will spend a lot of time smoothing these blemishes away and making sure the sides are smooth.


The grain is beautiful but scratches easily, a lot happened while I was routing the edges smooth and then sanding with my newly acquired drum sanders which fit in my drill but seem to leave lots of marks.


I stopped working on the sides after a couple of hours of sanding and turned my attention to the back, I scraped the surface with a cabinet scraper and smoothed out any remaining lumps and bumps with 120 grit sand paper.  Finally I applied a couple of coats of sanding sealer which I let soak into the wood.  This will both fill the pores in the wood and also provide some protection as well as helping prepare the surface for the final finish.  At that point I decided to call it a day!